How to create advanced text effects in Photoshop: mini-guide

The ability to create advanced text effects in Photoshop is essential for any graphic design professional. Not only does it allow you to create unique and eye-catching text for any project, it also allows you to differentiate yourself from the competition and offer added value to your clients.
In a world where aesthetics are increasingly
important, the ability to create eye-catching, customised text effects can make all the difference to your business. Text effects can help create a corporate identity for a company, or create an eye-catching image for a marketing initiative.
Text effects can be used to create a professional and sophisticated look for any project.
Adobe Photoshop and its functions
Adobe Photoshop is professional image processing software that allows you to create, edit and optimise digital images.
It was originally developed for processing black-and-white images and editing photographic negatives, but is now used in a wide range of applications, including graphic design, digital photography and video post-production.
With Photoshop, a wide range of operations can be performed, including selecting and editing individual pixels, creating special effects, compositing images and creating animations.
The software includes advanced tools for selecting, editing and painting, as well as tools for colour adjustment, distortion correction and defect removal.
One of the most powerful features of Photoshop is its ability to use layers, which allow you to work on different parts of an image separately and combine them later.
This makes it possible to create sophisticated effects and to edit images precisely.
Photoshop is available for both Windows and macOS and comes with a wide range of templates, brushes and resources to help users get started.
In addition, there is a large community of Photoshop users who share tutorials, tips and resources to help users learn and improve their skills.
Photoshop is considered to be one of the most powerful and versatile image processing software packages available, and is used in a wide range of industries, including graphic design, photography, advertising, film and television. Many image and communication professionals use Photoshop on a daily basis to create and edit images and visual projects.
How to create advanced text effects in Photoshop
Creating advanced text in Photoshop is one of the most important functions for graphic design. With its numerous formatting options, effects and editing tools, you can create unique and eye-catching text for any project. In this detailed guide, we will see how to use Photoshop’s advanced functions to create striking text effects.
Step 1: Choice of Text Type
The choice of text type can significantly influence the final appearance of your design. Here is a mini-guide to help you choose the right text type for your design.
A) Choosing the right font for your project:

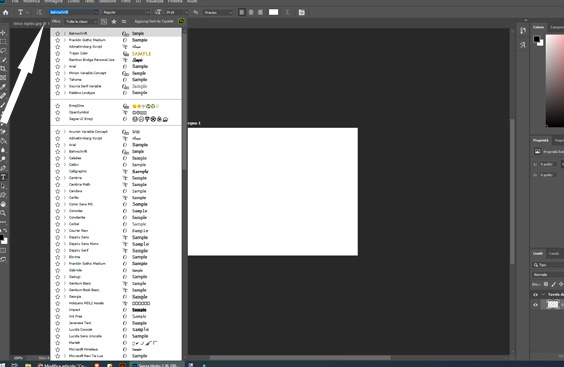
To choose the right font for your project, you can use the ‘Layers’ panel in the left-hand sidebar. Click on the ‘T’ in your project, then go to the top bar and select the font from the drop-down menu. Here you will find all the fonts installed on your computer and can select the one you prefer.
B) Consider Readability: To check the readability of the font, you can try changing the font size in your project. To do this, select the text, go to “Type” in the top bar and select “Font size”. Here you can increase or decrease the font size to achieve the desired readability.
C) Choosing a font with a range of weights: To choose a font with a range of weights, follow the steps described above to select the right font for your project. Once you have selected the font, you can select the weight you prefer from the “Font Type” menu.
D) Choosing a font with a range of styles: To choose a font with a range of styles, follow the steps above to select the right font for your project. Once the font is selected, you can select the style you prefer from the “Font” menu.
E) Consider compatibility: To check the compatibility of the font, it is important to ensure that the chosen font is available on the operating systems of the final recipients. Once you have selected the font, you can check compatibility by checking whether the font is available on the operating systems your end recipients use. If not, you may have to choose a different font or find a way to make the selected font compatible with these operating systems.
Step 2: Using advanced text effects
Text effects in Photoshop are a great way to make text more attractive and interesting in graphic projects. Here is a mini-guide for using text effects in Photoshop:
A) Open a new document in Photoshop.
B) Select the ‘Text’ tool from the toolbar on the left.
C) Type in the text you want to use and change the properties, such as font, size and colour, using the ‘Text’ panel in the right-hand sidebar.
D) Right-click on the text and select ‘Text Layers’ from the pop-up menu. This will open the text as a separate layer in the ‘Layers’ panel.
E) Double-click with the mouse on the text layer and select “Text Effects” from the pop-up menu.
F) Select the text effect you wish to use, such as shading, border or fill with an image.
G) Change the properties of the text effect, such as size, position and colour, using the ‘Text Effects’ panel.
H) Click ‘OK’ to apply the text effect.
I) Repeat steps E-H to add further text effects to the text.
Step 3: Creating 3D effects
Creating 3D effects in Photoshop is a simple and intuitive process, and can be done in a few easy steps. Here is a mini-guide for creating 3D effects in Photoshop:
A) Open an image in Photoshop and select the object you want to transform into 3D.
B) Use the selection tool to select the object you want to transform into 3D.
C) Click on “Layer” in the top menu, select “New 3D Layer” and choose “From Selected Layer”. This will transform the selected object into a 3D object.
D) Click on “Window” in the top menu and select “3D”. This will open the ‘3D’ window.
E) Use the knobs in the ‘3D’ window to rotate and move the 3D object to the desired position. You can also adjust the brightness, transparency and other visual elements of the 3D object.
F) Click on ‘Render’ in the ‘3D’ menu to make the 3D object visible in the image.
G) Use the “Lights” tool in the “3D” window to add lights to the 3D object and create lighting effects.
H) Save the image with the 3D effect and continue experimenting with the different tools and options to create unique and customised 3D effects.
With these simple steps, you will be able to create amazing and engaging 3D effects in Photoshop. Experiment with different objects and techniques to create unique and customised 3D effects.

Step 4: Creating distortion effects
Creating distortion effects in Photoshop is a simple and powerful way to create quirky and interesting images. Here is a mini-guide to get you started:
A) Open an image in Photoshop:
Open the image you wish to distort using photo editing software.
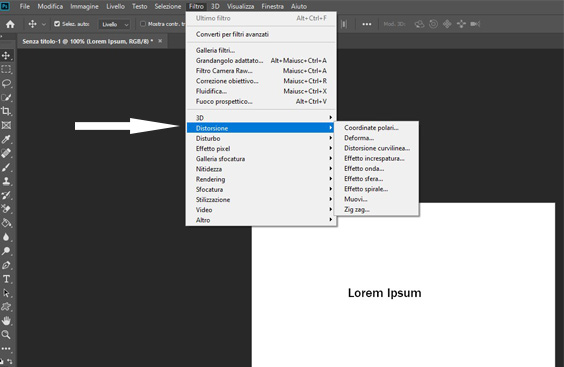
B) Select the distortion tool: Choose the distortion tool at the top under “Filter”.
C) Create control points: Click on the image to create control points. These control points are the anchor points that you will use to deform the image.
D) Manipulate the control points: Drag the control points to deform the image. Keep in mind that the more control points you have, the more detailed the final result will be.
E) Modify the distortion: To modify the distortion effect, use the controls of the deformation tool. You can adjust the shape, size and direction of the distortion using these controls.
F) Adjust transparency: If you want the distortion effect to be less noticeable, you can adjust the transparency using the layer transparency controls.
G) Save the image: Once you have the desired result, save the image using the “Save As” command.
Step 5: Save and share your work
Once you have completed your work, be sure to save your file in a format suitable for future use. You can use formats such as JPEG, PNG or GIF for images intended to be shared on social media or a website, or formats such as TIFF or PSD for images intended to be printed or further edited.
To save a file in photoshop, follow these steps:
A) Go to File > Save or press Ctrl + S (for Windows) or Command + S (for Mac)
B) Choose the location where you want to save the file
C) Select the desired file format (we recommend choosing the .psd format to retain all of the photoshop features in the file)
D) Name the file and click Save
To share a file in photoshop, there are several options:
A) Export as PDF: you can export your file as a PDF document that can be opened on any computer with Adobe Reader. To do this, go to File > Export > Create PDF.
B) Save for the web: This option allows you to export the file in a lighter format, such as JPEG or PNG, which can be shared more easily on social media or via e-mail. To do this, go to File > Export > Save for web.
C) Share through a cloud storage service: you can save your file on a cloud storage service such as Dropbox or Google Drive and send a share link to anyone who wants to see the file.
This way, you can easily save and share your photoshop work with others.
How to create advanced text effects in Photoshop, conclusions
In a world where aesthetics are increasingly important, the ability to create eye-catching, customised text effects can make all the difference to your business. Knowing how to use Photoshop’s advanced features to create striking text effects will give you a competitive edge in graphic design, allowing you to create unique visual designs that grab your audience’s attention and stand out from the crowd.
Furthermore, using advanced text effects in Photoshop will save you time and money, as you will be able to create sophisticated text effects without having to hire a professional or use expensive software.
Furthermore, knowing how to create advanced text effects will allow you to improve the quality of your work, creating a professional and sophisticated look for any project.
Ultimately, knowing how to create advanced text effects in Photoshop is an essential skill for any graphic design professional that will help you stand out from the competition, save time and money, and improve the quality of your work.

